Quick Navigation
Written by
Battlefield REDSEC Guide Team
Experienced Battlefield players since 2011 | Content verified through gameplay testing
📅 Last Updated: December 20, 2025 | ✅ Verified for Season 1
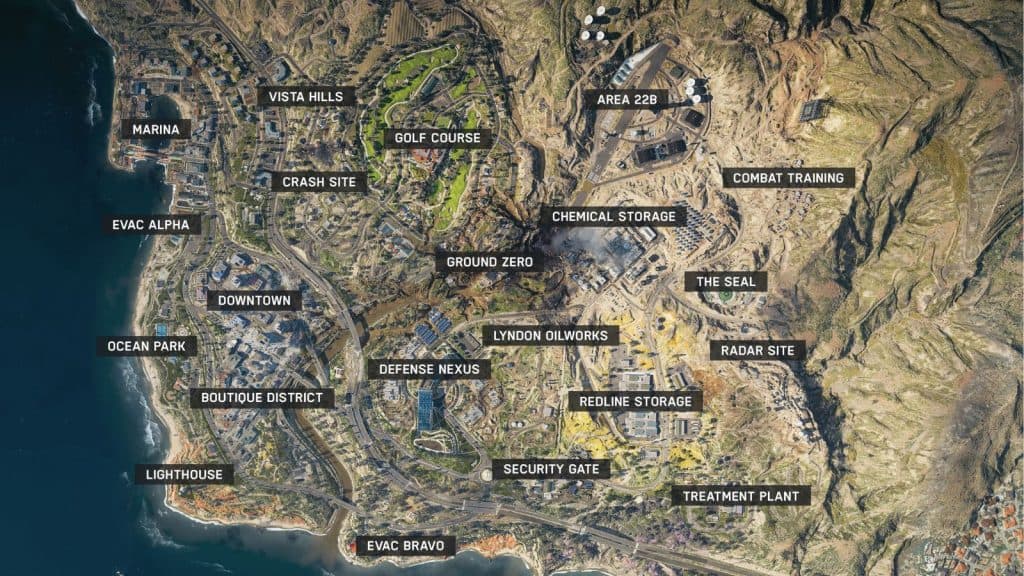
Fort Lyndon is the primary Battle Royale map in Battlefield REDSEC, featuring a massive 5x5 km battlefield with urban zones, military bases, industrial complexes, and rural areas. With 100 players dropping into each match, knowing the map layout and best strategies is crucial for victory.
Battlefield REDSEC Map: Fort Lyndon Full Map
Click to view full resolution map
🗺️ Map Features
- Urban Combat: Dense city areas with multi-story buildings and CQB opportunities - Perfect for Assault and SMGs
- Military Bases: High-value loot locations with vehicle access - Ideal for Engineer Class
- Open Fields: Vehicle-focused combat zones between POIs - Recon excels with Sniper Rifles
- Industrial Zones: Mid-range combat with cover and verticality - Support with LMGs dominates
- Dynamic Circle: Storm closes randomly each match for unique endgames - See All Guides for strategies
Battlefield REDSEC Map: Major Points of Interest (POIs)
25+ named locations across Fort Lyndon
🔥 Hot Drop POIs (High Risk, High Reward)
Downtown District
Hot DropLocation: Center of map (Grid D4-E4)
Loot Quality: ⭐⭐⭐⭐⭐ (Excellent)
Player Density: Very High (15-25 players)
Best For: Aggressive players, skilled squads
The largest urban area with skyscrapers, offices, and shops. Tons of loot but expect heavy combat immediately. Multiple verticality options for Assault class.
- Land on rooftops to get height advantage
- Watch for third-party fights from windows
- Engineer crates in underground parking
Fort Lyndon Military Base
Hot DropLocation: Southwest (Grid B6-C6)
Loot Quality: ⭐⭐⭐⭐⭐ (Excellent)
Player Density: High (10-15 players)
Best For: Vehicle hunters, Engineers
Main military installation with barracks, hangars, and armory. Guaranteed vehicle spawns including tanks (with keycard). Best loot density on the map.
- Tank keycards spawn in Command Center
- Helicopters spawn at helipads (north side)
- Engineer crates in armory building
Lyndon International Airport
Hot DropLocation: Northeast (Grid G2-H2)
Loot Quality: ⭐⭐⭐⭐ (Very Good)
Player Density: High (10-15 players)
Best For: All classes, squads
Large civilian airport with terminals, hangars, and runways. Open sightlines on runways make snipers dangerous. Good vehicle spawns.
- Terminal building has best loot
- Avoid open runways early game
- Helicopters spawn at hangar
⚖️ Balanced POIs (Medium Risk, Good Reward)
Industrial Harbor
BalancedLocation: East coast (Grid H4-H5)
Loot Quality: ⭐⭐⭐⭐ (Very Good)
Player Density: Medium (5-10 players)
Shipping docks with containers, warehouses, and cranes. Great verticality and Engineer crates. Good rotation options.
Residential Suburbs
BalancedLocation: North-central (Grid E2-F2)
Loot Quality: ⭐⭐⭐ (Good)
Player Density: Medium (5-8 players)
Housing development with residential homes and parks. Spread-out loot requires looting multiple houses. Safe early game option.
Processing Factory
BalancedLocation: South-central (Grid D6-E6)
Loot Quality: ⭐⭐⭐⭐ (Very Good)
Player Density: Medium (5-10 players)
Large industrial complex with factories and storage buildings. Lots of Engineer crates and vehicle parts.
Lyndon Mall
BalancedLocation: Central-north (Grid E3)
Loot Quality: ⭐⭐⭐⭐ (Very Good)
Player Density: Medium (6-10 players)
Multi-story shopping center with interior combat focus. Great for CQB specialists. Parking garage has vehicles.
Sports Stadium
BalancedLocation: Northwest (Grid C2)
Loot Quality: ⭐⭐⭐ (Good)
Player Density: Medium (4-8 players)
Large sports complex with open field and surrounding structures. Central field is dangerous. Loot in concourse areas.
Rail Yard
BalancedLocation: Southwest (Grid B5)
Loot Quality: ⭐⭐⭐ (Good)
Player Density: Low-Medium (3-6 players)
Train depot with cargo trains and maintenance buildings. Linear layout makes rotations predictable.
🛡️ Safe POIs (Low Risk, Decent Reward)
Farmlands
Safe DropLocation: West (Grid A3-A4)
Loot Quality: ⭐⭐ (Fair)
Player Density: Low (1-3 players)
Rural area with farmhouses and barns. Peaceful start but requires rotation to get better loot. Good for beginners.
Highway Rest Stop
Safe DropLocation: Multiple locations
Loot Quality: ⭐⭐ (Fair)
Player Density: Low (0-2 players)
Small gas stations with shops. Quick loot spots for fast rotations. Vehicle spawns guaranteed.
Forest Outpost
Safe DropLocation: Southeast (Grid G7)
Loot Quality: ⭐⭐ (Fair)
Player Density: Very Low (0-2 players)
Remote military checkpoint. Minimal loot but safe start. Good for passive playstyle.
Coastal Lighthouse
Safe DropLocation: Southeast coast (Grid H6)
Loot Quality: ⭐⭐ (Fair)
Player Density: Very Low (0-1 players)
Isolated lighthouse on coast. Edge of map location means limited rotation options. Sniper paradise.
Battlefield REDSEC Map: Best Drop Spots by Playstyle
Choose your landing zone based on your goals
Aggressive Players
Goal: High kills, practice combat
Recommended Drops:
- Downtown District - Most action, CQB fights
- Military Base - Vehicle chaos, high skill players
- Airport - Medium-range combat, good loot
Pro Tips: Land fast, grab any weapon, push fights immediately. Don't over-loot.
Balanced Players
Goal: Decent loot, some action
Recommended Drops:
- Industrial Harbor - Good loot, manageable fights
- Lyndon Mall - Mixed combat ranges
- Processing Factory - Engineer-friendly
Pro Tips: Loot efficiently, third-party nearby fights, rotate toward circle center.
Passive/Win-Focused
Goal: Survive to endgame, placement
Recommended Drops:
- Farmlands - Peaceful, edge of map
- Forest Outpost - Isolated, safe
- Residential Suburbs - Spread out loot
Pro Tips: Land far from flight path, loot fully, stay in safe zone, avoid fights until top 10.
Beginners
Goal: Learn the map, survive
Recommended Drops:
- Residential Suburbs - Simple layouts
- Rail Yard - Easy to navigate
- Highway Rest Stops - Quick loot
Pro Tips: Avoid hot drops until you're confident. Focus on looting and positioning over kills.
Battlefield REDSEC Map: Vehicle Spawn Locations
12 guaranteed vehicle spawn points across the map
🚜 Tanks (Keycard Required)
Tanks require special keycards to unlock. Extremely powerful but limited spawns.
Tank Keycards: Found in Engineer crates, Supply Drops, or by eliminating players who have them. Only Engineers can access Engineer crates.
🚁 Helicopters
Air transport for fast rotations and squad mobility. No unlock required.
🚗 Transport Jeeps & Trucks
Common ground vehicles for fast movement. Spawn at multiple locations.
🔧 Vehicle Tips
- Engineers can repair vehicles - Essential for keeping tanks operational
- Helicopters make noise - Everyone knows your location
- Tanks dominate final circles - But vulnerable to coordinated attacks
- Always check for vehicles early - Critical for rotating to safe zone
- Run over loot to auto-pickup - Save time while in vehicles
Battlefield REDSEC Map: Redeploy Tower Locations
8 towers allow squad respawn after free respawn used
Redeploy Towers are critical for bringing back eliminated squadmates after they've used their one-time free respawn. These towers are scattered across the map and become increasingly important as the match progresses.
Tower Alpha
Location: Military Base (Grid C6)
Status: Always active
Tower Bravo
Location: Downtown North (Grid E3)
Status: Always active
Tower Charlie
Location: Airport (Grid H2)
Status: Always active
Tower Delta
Location: Industrial Harbor (Grid H5)
Status: Always active
Tower Echo
Location: Processing Factory (Grid E6)
Status: Always active
Tower Foxtrot
Location: Stadium (Grid C2)
Status: Always active
Tower Golf
Location: Residential (Grid F2)
Status: Always active
Tower Hotel
Location: Rail Yard (Grid B5)
Status: Always active
📡 Redeploy Tower Strategy
- Respawn costs credits - Earn credits by looting, kills, and survival time
- Loud and visible - Enemies will see the respawn animation and hear the sound
- Squadmate spawns in the air - They redeploy from dropship, not at tower
- Use during chaos - Best time is during third-party fights nearby
- Cover the spawn - Position team to protect the respawning player
- Late game priority - Keeping full squad in top 10 is crucial
Battlefield REDSEC Map: Rotation Strategies
How to move efficiently and safely across the map
🌅 Early Game Rotation (Circle 1-2)
Strategy:
- Loot efficiently: Don't over-loot your starting POI. Get basics and move.
- Rotate early: Beat the crowd moving to next circle.
- Secure vehicles: Critical for long rotations.
- Avoid center early: Too many squads converging. Rotate on edges.
- Third-party opportunities: Listen for fights and cleanup weakened squads.
Safe Routes:
Use main roads with vehicles, or rotate through forest/field edges. Avoid crossing through major POIs unless you want action.
🌤️ Mid Game Rotation (Circle 3-4)
Strategy:
- Position over loot: Get good positioning in circle instead of chasing loot.
- Take high ground: Buildings, hills, and elevated positions.
- Watch rotations: Most kills come from catching rotating teams.
- Don't chase kills: Preserve health and ammo for endgame.
- Use vehicles wisely: Great for rotation, but makes you visible.
Positioning Priority:
Get to center of next circle early and hold power positions. Let others fight for entry.
🌆 End Game Rotation (Circle 5-7)
Strategy:
- Read the circle: Predict final zones and pre-position.
- Natural cover priority: Rocks, trees, defilade positions.
- Don't peek the same angle: Snipers are waiting.
- Use utility: Smokes, stuns, recon drones.
- Watch for tanks: Tanks dominate final circles. Have anti-tank tools.
- Team positioning: Spread out but maintain support distance.
Final Circle Tips:
Zone control > Kills. Force others to rotate into you. Use storm damage to your advantage. Final 1v1 often decided by who has better position, not better aim.
🎯 Advanced Rotation Tips
- Path of least resistance: Rotate where you see the least activity
- Zone edge strategy: Staying on edge is safer but limits options
- Rotate during fights: When big fights happen, everyone watches them - perfect time to move
- Audio cues: Listen for gunfights to know where NOT to rotate
- Vehicle abandonment: Ditch vehicles before endgame - they're death traps in final circles
Battlefield REDSEC Map Tips
Master these tips to dominate the battlefield
Learn the Map Grid
Fort Lyndon uses a grid system (A-H, 1-7). Mastering grid call-outs helps your squad coordinate effectively. "Enemy squad at E4" is faster than "over there by the buildings."
Verticality is Key
Downtown and urban POIs have multi-story buildings. Assault's grappling hook dominates here. Always check rooftops and upper floors before entering.
Control the Skies
Helicopters give massive advantages for rotations and scouting. Carry anti-air weapons (DMRs, LMGs) to contest enemy helicopters.
Engineer Crate Locations
Engineer-only crates contain exclusive high-tier loot including tank keycards. Memorize locations: Military Base armory, Harbor warehouse, Downtown parking, Factory storage.
Supply Drop Strategy
High-value supply drops land randomly in safe zone. Contain best weapons and tank keycards. Heavily contested - approach with caution or ambush others.
Radio Towers
Climbing radio towers gives perfect scouting views. Recon class should use these with drones. Dangerous - you're visible from everywhere.
Water Combat
Coastal areas and harbor have water zones. Swimming is slow and vulnerable. Avoid unless necessary. No underwater combat.
Environmental Hazards
Explosive barrels, gas tanks, and vehicles can be shot to create explosions. Use environment to your advantage in fights.
Audio Positioning
Fort Lyndon has excellent audio design. Footsteps, gunshots, and vehicles are all directional. Use quality headphones for advantage.
Weather & Lighting
Dynamic time of day affects visibility. Sunrise/sunset can blind players looking into sun. Use to your advantage when rotating.
Loot Efficiency
Don't spend more than 3-4 minutes looting one POI. Get essentials (gun, armor, ammo) and rotate. You can loot from eliminated enemies.
Third-Party Central
Fort Lyndon's layout encourages third-partying. After winning a fight, heal fast and reposition - another squad is probably coming.